First, make sure download HackedProcessKiller app from the main page.
Second, create a folder 'C:\W10-SECURED-SW-FOLDER' and unzip HackedProcessKiller.zip.
Third, download and unzip 3 files (HackedProcessGroup.list, HackedProcessNames.list, and W10TakeOwnerFolder.bat) to 'C:\W10-SECURED-SW-FOLDER\HackedProcessKiller' folder.
Next, open Command Prompt in Administrator mode, and type command 'C:\W10-SECURED-SW-FOLDER\HackedProcessKiller\StartHackedProcessKiller.bat' to run the 'HackedProcessKiller.jar' file. If the app is not opened, then you need to install Java JRE . When the app is run, these 2 files (HackedProcessGroup.list & HackedProcessNames.list) should be enough to protect your Windows 10 PC in to kill hacked processes.
The extra batch file is provided to help you create a secured folder 'C:\MY W10 SECURED DATA FOLDER' for your data files by command prompt 'C:\W10-SECURED-SW-FOLDER\HackedProcessKiller\W10TakeOwnerFolder.bat "C:\MY W10 SECURED DATA FOLDER"'. This command will secure folder 'C:\MY W10 SECURED DATA FOLDER' with only your account user name with full access.
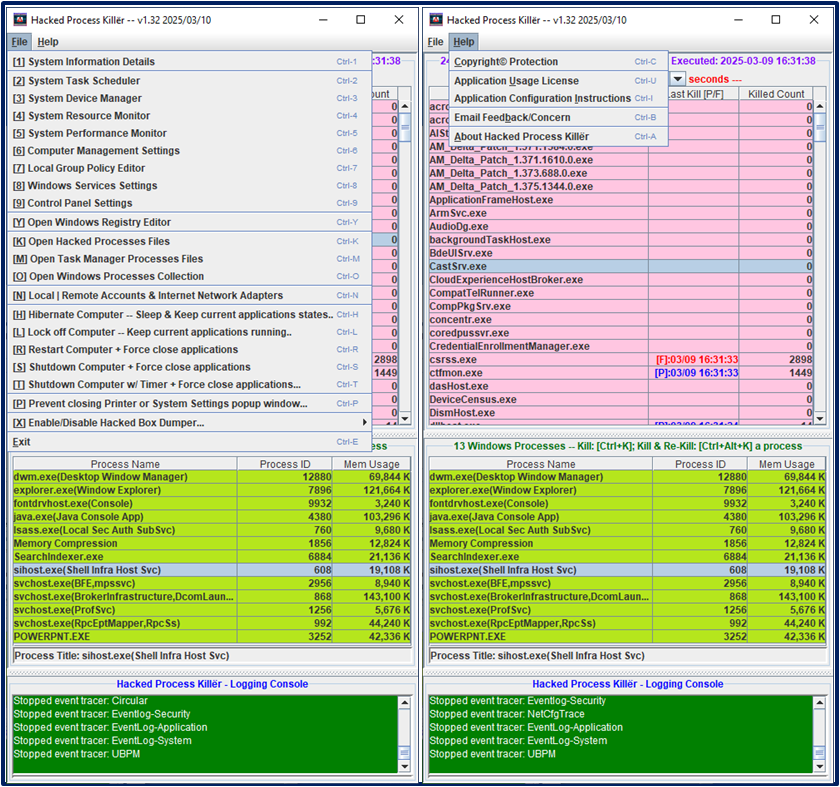
The 'HackedProcessKiller' app provides flexiable and customizable commands, and you can add into 'HackedProcessKiller.cmd' run once when app starts or 'HackedProcessKiller[m].cmd' (m: minutes periodically running) for more personal customizable protection. Also, don't forget to turn on 'Hacked Box Dumper' from 'File ⇒ [X]: Enable/Disable Hacked Box Dumper'; also enable for next login.
About HackedProcessKiller v1.32 2025/03/10
WARNING: The secured setup to protect new PC is recommended for computer without using Internet to protect your works from hacking.
Computers with existing Internet are highly be hacked from accessing Internet even with secured setup provided on the other link.
Plus high potential hacking of Windows built-in Services that communicating with external devices, USB devices like mouse & keyboards...
So, no instruction is provided in this page to secure computers that use with Internet.
Recommend using HackedProcessKiller app to help you identify strange or hacking processes easier and protect your computer with Internet for now.
Secure Windows Folder Tricks
How to create and take ownership of a folder? The above steps you already have the batch file 'W10TakeOwnerFolder.bat'. Create and/or take ownership of 'C:\W10-SECURED-DATA-FOLDER' for instance, you can use command prompt 'C:\W10-SECURED-SW-FOLDER\HackedProcessKiller\W10TakeOwnerFolder.bat "C:\MY W10 SECURED DATA FOLDER"'. The batch script will create folder 'C:\MY W10 SECURED DATA FOLDER' if it does not exist.
How to check for folder ownership? You can try the followings with snapshots.
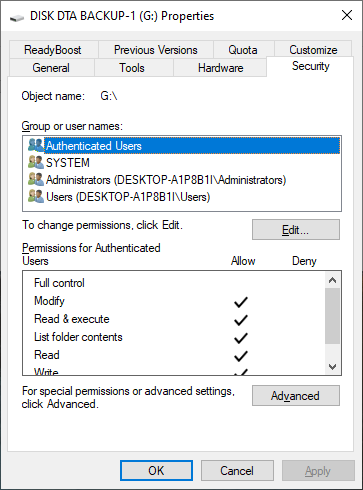
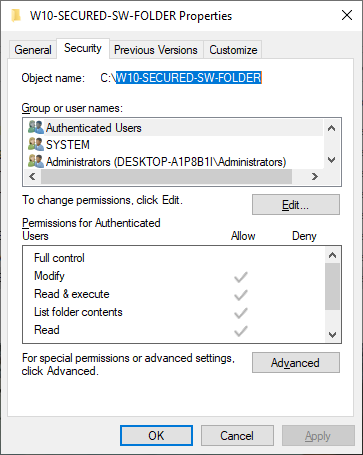
Select and right-click a folder, select 'Properties' then a window will popup.
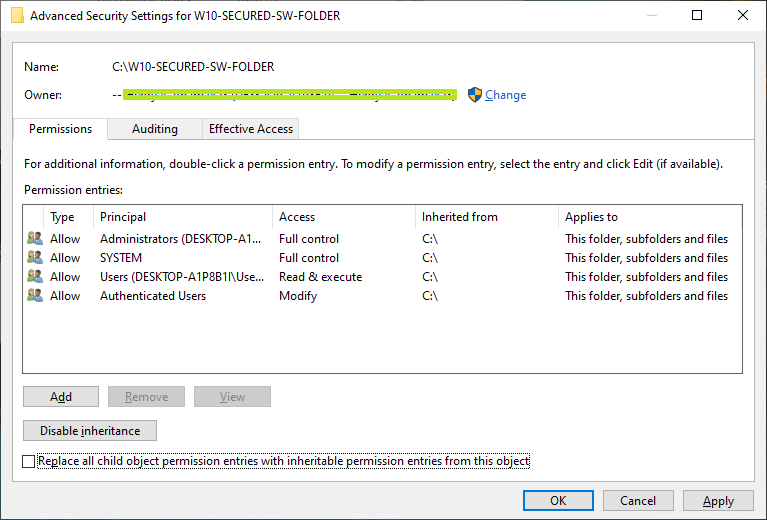
From Security tab, click 'Advanced' button.
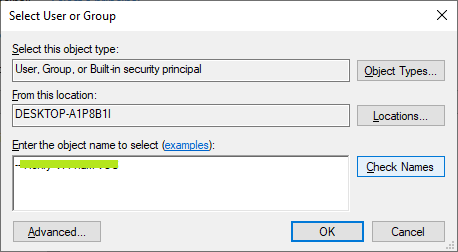
Click 'Change' link and enter your account name to change ownership if it's not your account. Click 'Check Names' to make sure your account is correct, then click 'OK' button to confirm.
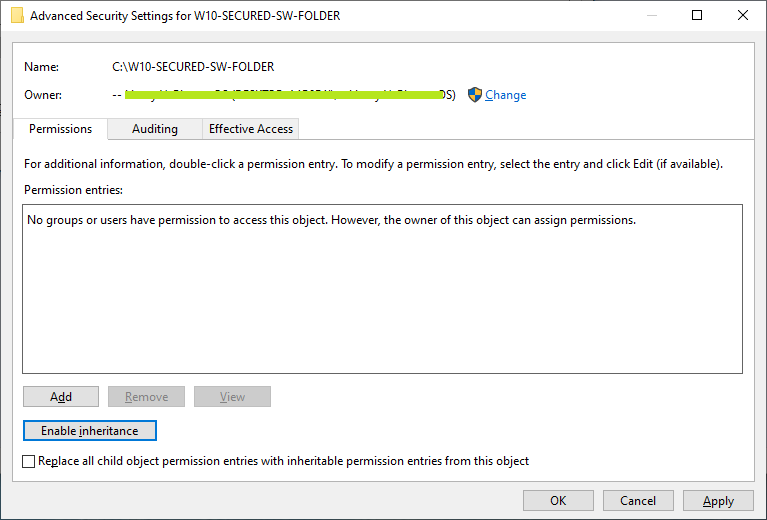
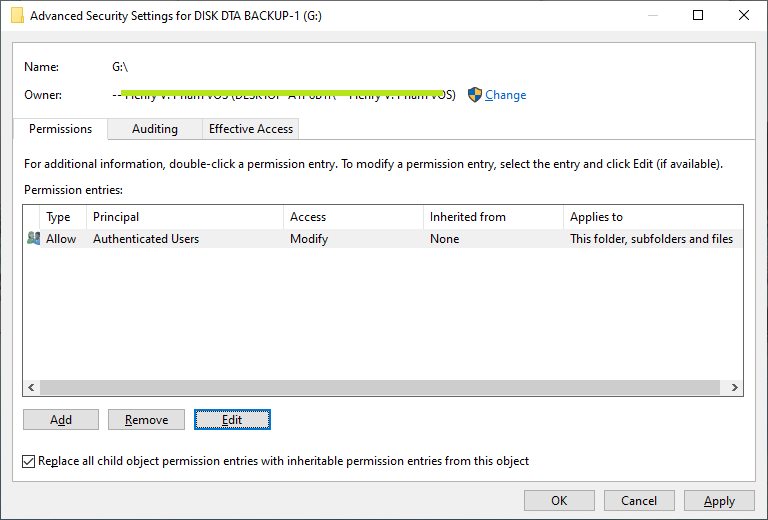
Next, make sure delete other accounts before add your account into the folder permission box by click on 'Remove' button or 'Disable Inheritance' button.
Then, click 'Add' button to add your account name as a principle account, and click 'OK' to confirm. Note that the popup window will be the same as shown in step 3.
Now make sure to check 'Full Control' permissions as shown below.
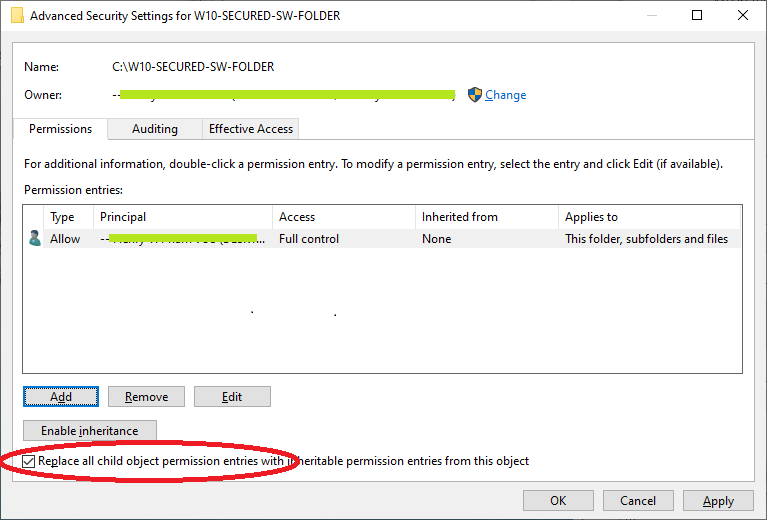
Finally, you have full permission for your folder as shown. Important: Make sure the check 'Replace all child object permission...' before click 'OK' button.
Secure USB Drive Tricks
How to set ownership for your USB stick/drive? You can try the followings with snapshots.
First, select and right-click on USB drive, and select 'Properties' then a popup window will be shown.
From Security tab, click 'Advanced' button. A popup window will show as below.
Click 'Change' link and enter your account name to change ownership if it's not your account. Click 'Check Names' to make sure your account is correct, then click 'OK' button to confirm.
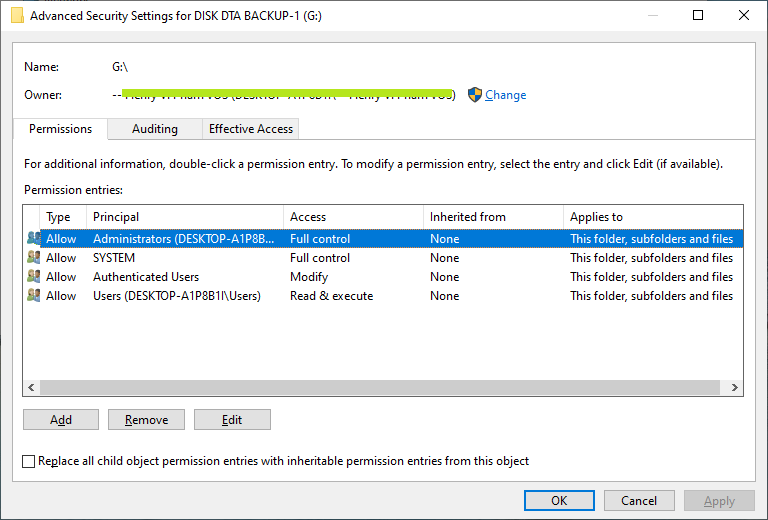
Next, make sure delete other accounts (keep only 'Authenticated users' account) before add your account into the folder permission box by click on 'Remove' button or 'Disable Inheritance' button.
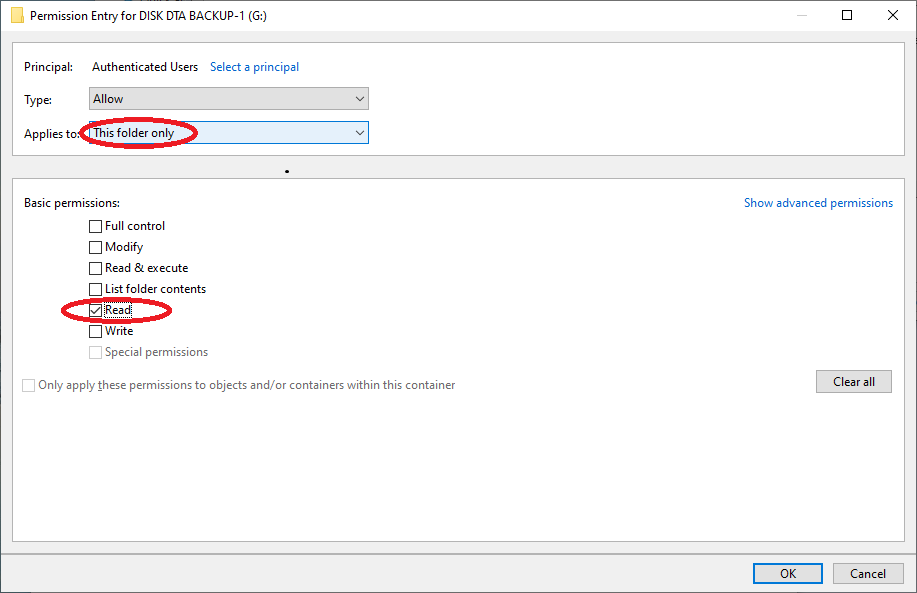
Then, click 'Modify' button to change permission of the 'Authenticated users' account to 'Read' readonly and 'Applies to: This folder only' as shown below.
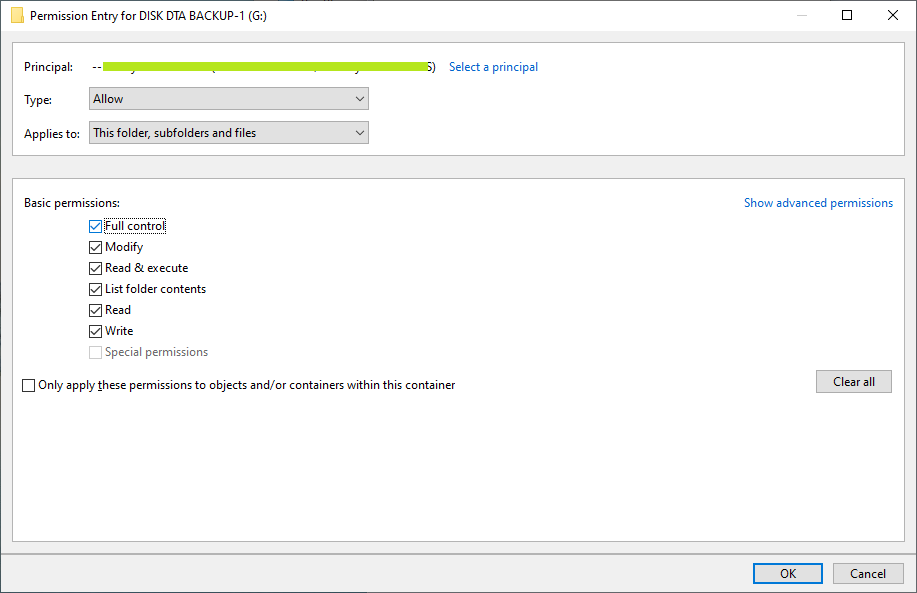
Now add your account as a principle account with 'Full Control' as shown below.
Finally, you have full permission for your folder as shown. Important: Make sure the check 'Replace all child object permission...' before click 'OK' button.
Take Ownership of USB Drive Tricks
What happens if you put your USB drive to a different Windows PC? You cannot able to access to your folders/files. You need to set ownership for your USB stick/drive to gain access. You can try the followings with snapshots.
How to take ownership of a USB drive? The above steps you already have the batch file 'W10TakeOwnerFolder.bat'. You can take ownership of USB drive 'E:' for instance, you can use command prompt 'C:\W10-SECURED-SW-FOLDER\HackedProcessKiller\W10TakeOwnerFolder.bat "E:"'. The batch script will set your ownership to the USB drive.
How to take ownership of a USB drive manually? You can try the followings with snapshots.
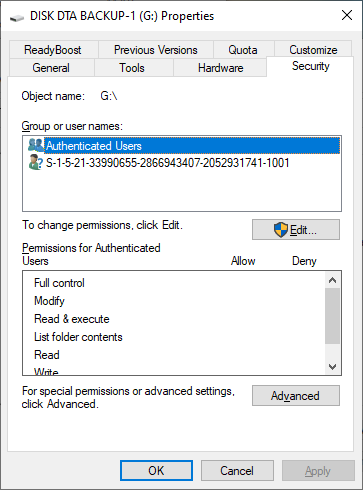
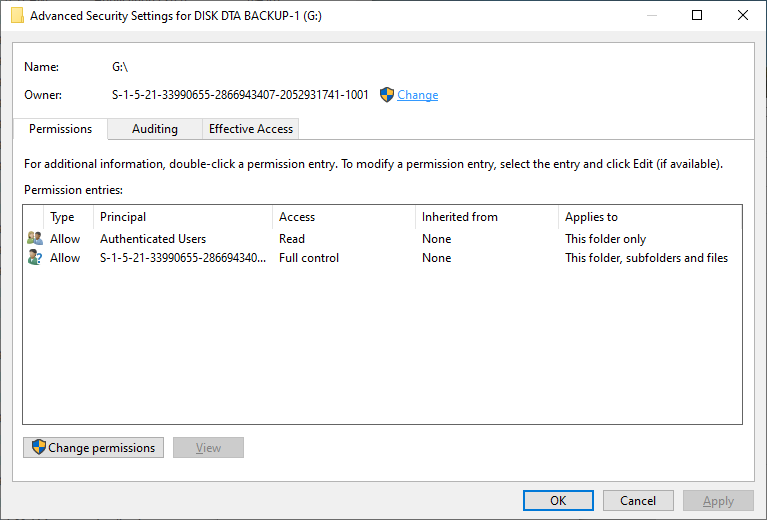
First, select and right-click on USB drive, and select 'Properties' then a popup window will be shown with a strange account 'S-1-5-21-...'.
From Security tab, click 'Advanced' button. A popup window will show as below.
Click 'Change' link and enter your account name to change ownership if it's not your account. Click 'Check Names' to make sure your account is correct, then click 'OK' button to confirm.
Then, make sure permission of the 'Authenticated users' account to 'Read' readonly and 'Applies to: This folder only' as shown below.
Now add your account as a principle account with 'Full Control' as shown below.
Finally, add your account as a principle account with 'Full Control' for full permission for your folder as shown. Important: Make sure the check 'Replace all child object permission...' before click 'OK' button.
Your USB drive is now on your own account. However, you need to remember to take ownership of your USB drive when you switch to different Windows PC.
These steps can be use to get back your data from your crashed Windows PC!
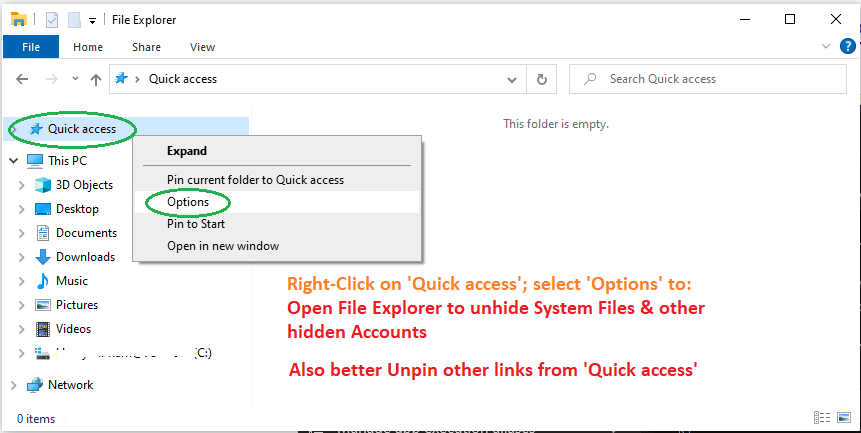
Windows Accounts -- Showing all hidden Windows Accounts
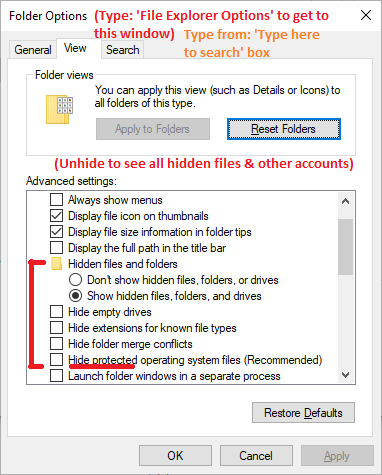
Enable hidden Accounts & System Files:
Unhide the hidden Windows System files to view all other accounts:
Goto 'C:\Users' folder and checkout all accounts that have been unhided with the above settings. WARNING: You can delete the unknown accounts with your own risk.